目錄
- 寫在前面
- 技術(shù)棧
- 實現(xiàn)思路
- 具體實現(xiàn)
- 讀取圖片
- 二值化
- 圖像膨脹
- 找輪廓
- 外接矩形
- 過濾字符
- 字符分割
- 構(gòu)造數(shù)據(jù)集
- 向量搜索(分類)
- 生成結(jié)果
寫在前面
當然這里說的百分百可能有點夸張�����,但其實想象一下��,游戲里面的某個窗口的字符就是那種樣子��,不會變化的����。而且識別的字符可能也不需要太多。中文有大幾千個常用字��,還有各種符號�,其實都不需要。
這里針對的場景很簡單�,主要是有以下幾點:
- 識別的字符不多:只要識別幾十個常用字符即可,比如說26個字母�,數(shù)字,還有一些中文����。
- 背景統(tǒng)一,字體一致:我們不是做驗證碼識別,我們要識別的字符都是清晰可見的���。
- 字符和背景易分割:一般來說就是對圖片灰度化之后,黑底白字或者白底黑字這種����。
技術(shù)棧
這里用到的主要就是python+opencv了。
環(huán)境主要是以下的庫:
pip install opencv-python
pip install imutils
pip install matplotlib
實現(xiàn)思路
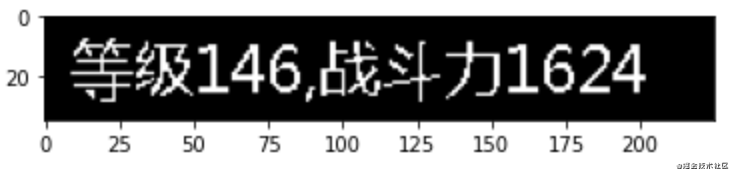
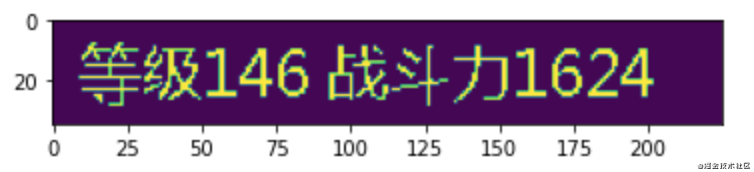
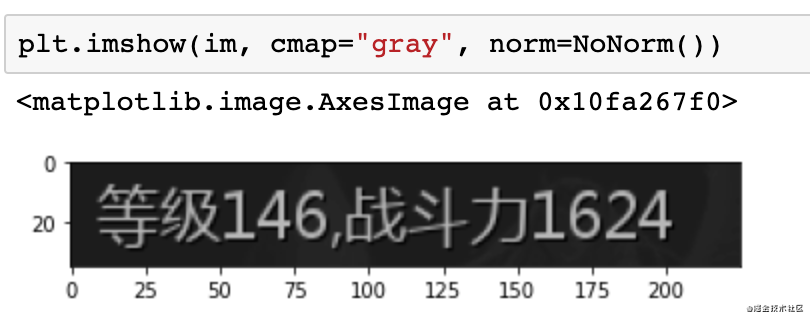
首先看下圖片的灰度圖��。

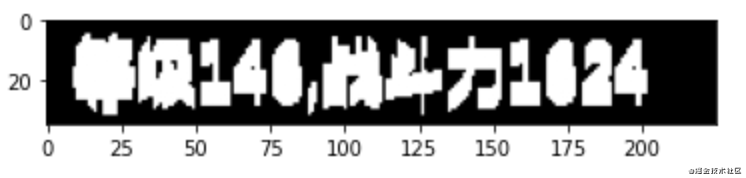
第一步:二值化���,將灰度轉(zhuǎn)換為只有黑白兩種顏色�����。
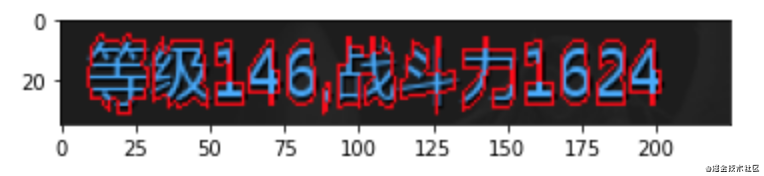
第二步:圖像膨脹��,因為我們要通過找輪廓算法找到每個字符的輪廓然后分割�,如果是字符還好�,中文有很多左右偏旁,三點水這種無法將一個整體進行分割����,這里通過膨脹將中文都黏在一起。
第三步:找輪廓�。
第四步:外接矩形��。我們需要的字符是一個矩形框�,而不是無規(guī)則的����。
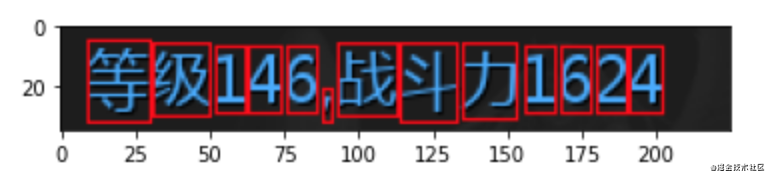
第五步:過濾字符,這里比如說標點符號對我來說沒用�����,我通過矩形框大小把它過濾掉��。
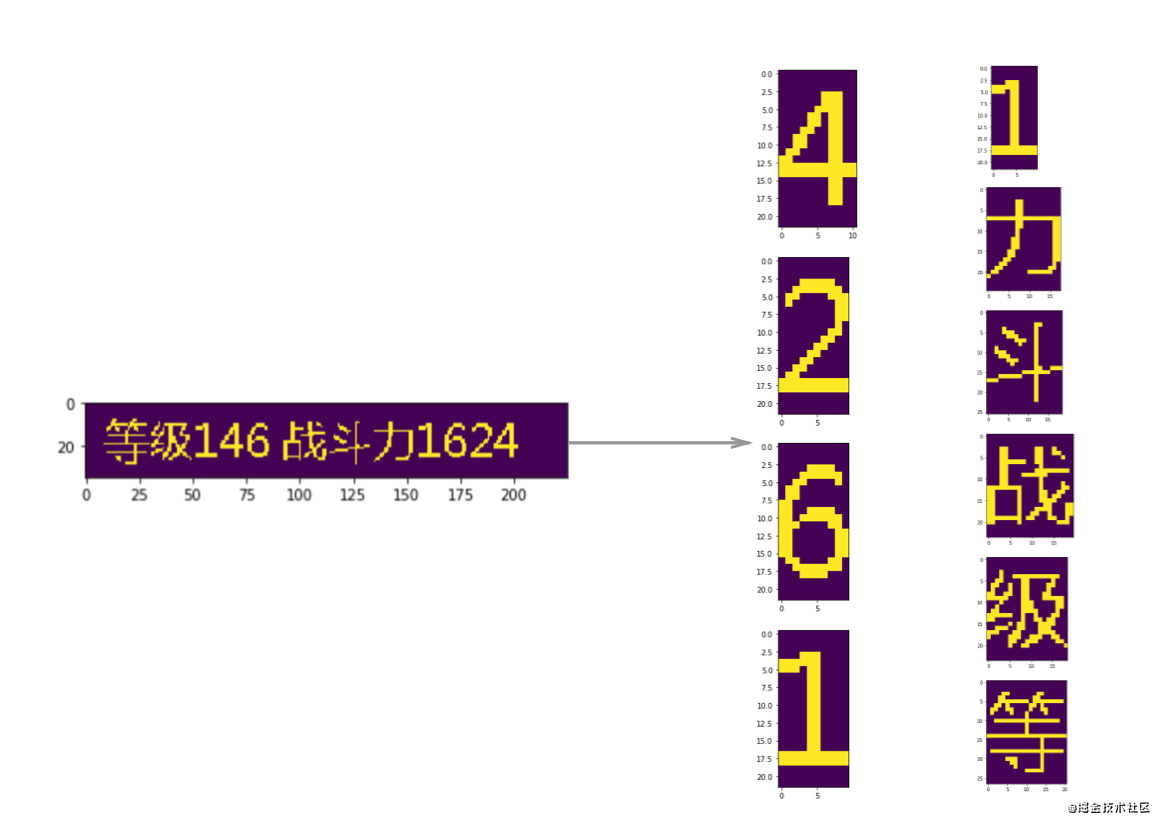
第六步:字符分割��,根據(jù)矩形框分割字符����。
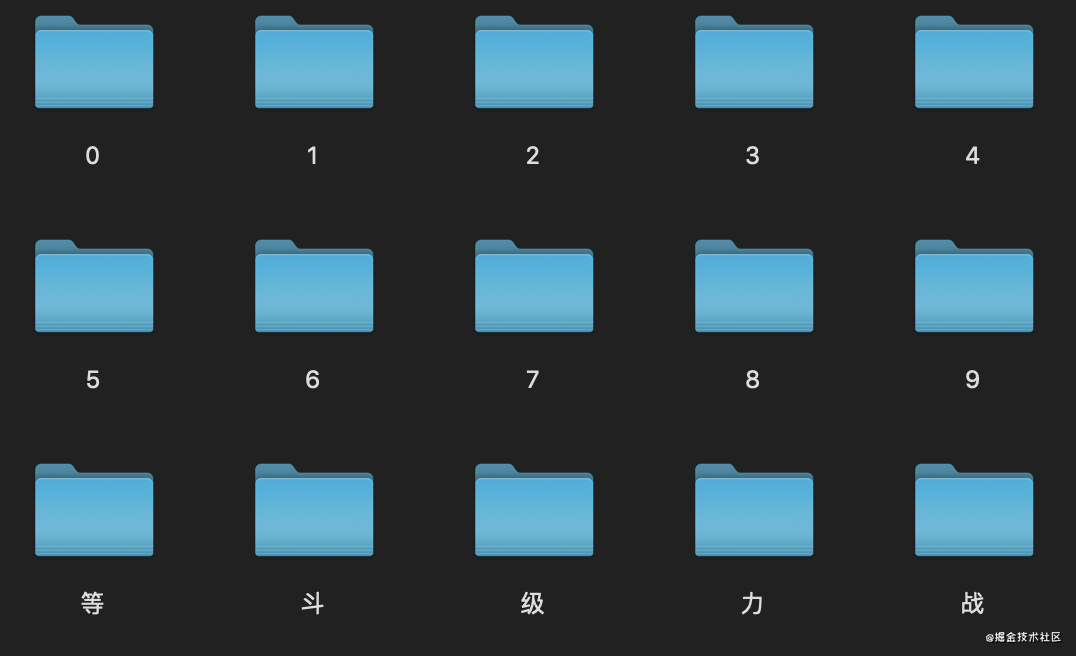
第七步:構(gòu)造數(shù)據(jù)集,每一類基本上放一兩張圖片就可以�����。
第八步:向量搜索+生成結(jié)果�����,根據(jù)數(shù)據(jù)集的圖片,進行向量搜索得到識別的標簽�。然后根據(jù)圖片分割的位置,對識別結(jié)果進行排序��。
具體實現(xiàn)
讀取圖片
首先先讀取待識別的圖片���。
import cv2
import numpy as np
from matplotlib import pyplot as plt
from matplotlib.colors import NoNorm
import imutils
from PIL import Image


img_file = "test.png"
im = cv2.imread(img_file, 0)
使用matplotlib畫圖結(jié)果如下:
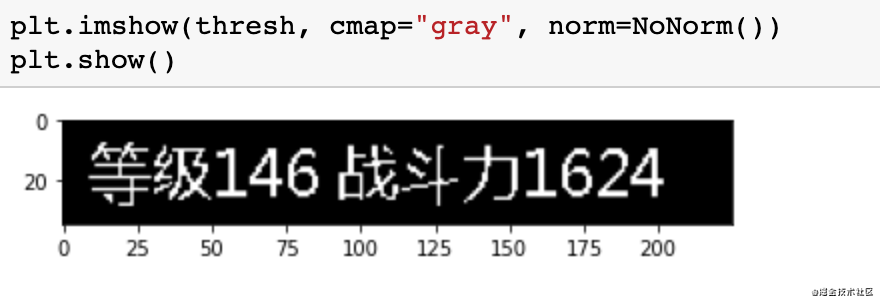
二值化
在進行二值化之前,首先進行灰度分析����。
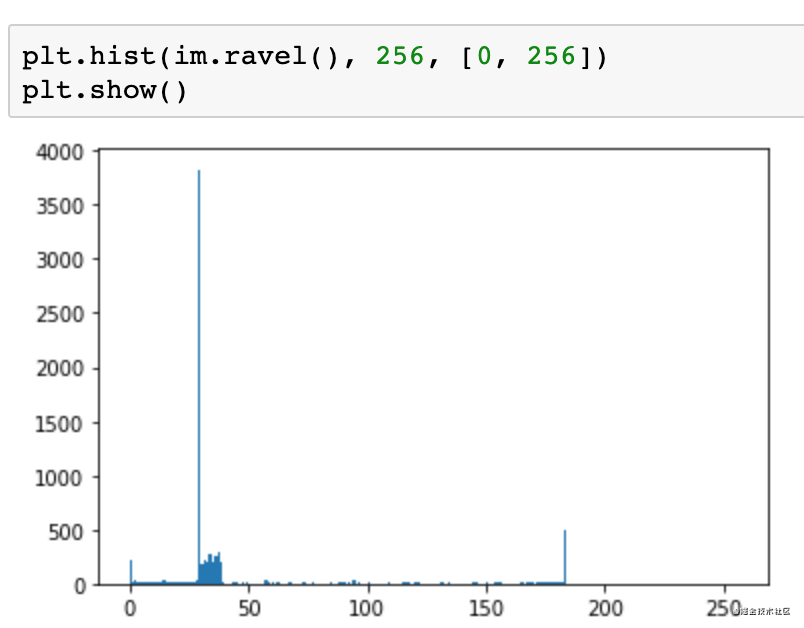
灰度值是在0到255之間,0代表黑色����,255代表白色?��?梢钥吹竭@里背景色偏黑的���,基本集中在灰度值30,40附近�。而字符偏白,大概在180灰度這里。
這里選擇100作為分割的閾值��。
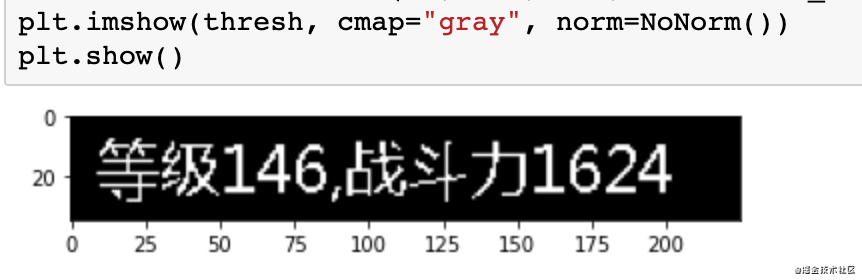
thresh = cv2.threshold(im, 100, 255, cv2.THRESH_BINARY)[1]
2值化后效果如下:
圖像膨脹
接下來進行一個圖像的縱向膨脹����,選擇一個膨脹的維度,這里選擇的是7�����。
kernel = np.ones((7,1),np.uint8)
dilation = cv2.dilate(thresh, kernel, iterations=1)

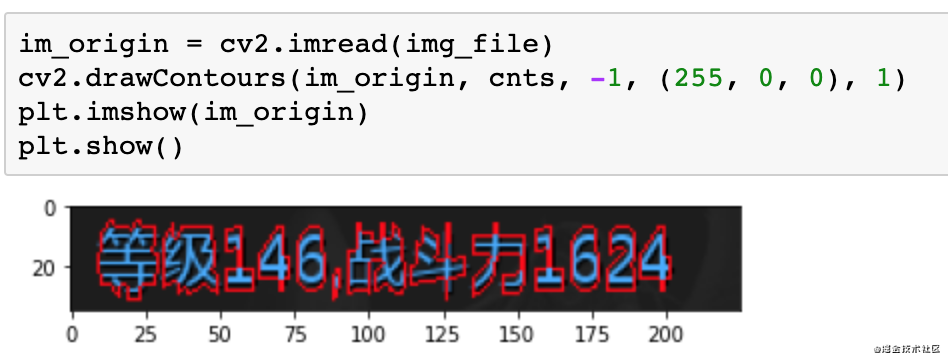
找輪廓
接下來調(diào)用opencv找一下輪廓��,
# 找輪廓
cnts = cv2.findContours(dilation.copy(), cv2.RETR_EXTERNAL, cv2.CHAIN_APPROX_SIMPLE)
cnts = imutils.grab_contours(cnts)
接下來我們再讀取一下原圖�,繪制輪廓看下輪廓的樣子。
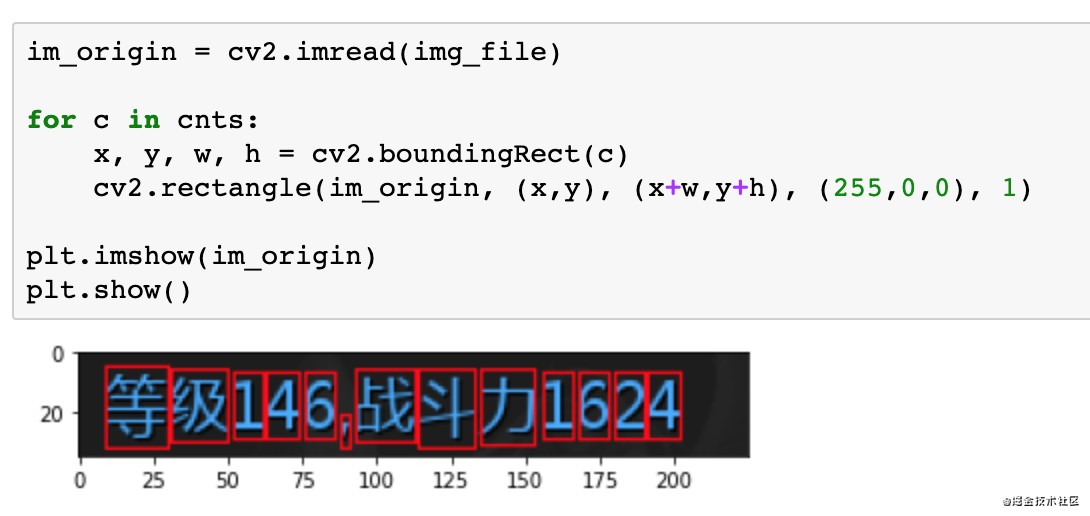
外接矩形
對于輪廓我們可以做外接矩形����,這里可以看下外接矩形的效果。
過濾字符
這里過濾字符的原理其實就是將輪廓內(nèi)的顏色填充成黑色�。下面的代碼是將高度小于15的輪廓填充成黑色。
for i, c in enumerate(cnts):
    x, y, w, h = cv2.boundingRect(c)
    if (h  15):
        cv2.fillPoly(thresh, pts=[c], color=(0))
填充后可以看到標點符號就沒了�����。
字符分割
因為圖像是個矩陣���,最后字符分割就是使用切片進行分割�。
for c in cnts:
    x, y, w, h = cv2.boundingRect(c)
    if (h  15):
        continue
    cropImg = thresh[y:y+h, x:x+w]
    plt.imshow(cropImg)
    plt.show()
構(gòu)造數(shù)據(jù)集
最后我們創(chuàng)建數(shù)據(jù)集進行標注,就是把上面的都串起來����,然后將分割后的圖片保存到文件夾里,并且完成標注���。
import cv2
import numpy as np
import imutils
from matplotlib import pyplot as plt
import uuid


def split_letters(im):
    # 2值化
    thresh = cv2.threshold(im, 100, 255, cv2.THRESH_BINARY)[1]
    # 縱向膨脹
    kernel = np.ones((7, 1), np.uint8)
    dilation = cv2.dilate(thresh, kernel, iterations=1)
    # 找輪廓
    cnts = cv2.findContours(dilation.copy(), cv2.RETR_EXTERNAL, cv2.CHAIN_APPROX_SIMPLE)
    cnts = imutils.grab_contours(cnts)

    # 過濾太小的
    for i, c in enumerate(cnts):
        x, y, w, h = cv2.boundingRect(c)
        if h  15:
            cv2.fillPoly(thresh, pts=[c], color=(0))

    # 分割
    char_list = []
    for c in cnts:
        x, y, w, h = cv2.boundingRect(c)
        if h  15:
            continue
        cropImg = thresh[y:y + h, x:x + w]
        char_list.append((x, cropImg))
    return char_list


for i in range(1, 10):
    im = cv2.imread(f"test{i}.png", 0)

    for ch in split_letters(im):
        print(ch[0])
        filename = f"ocr_datas/{str(uuid.uuid4())}.png"
        cv2.imwrite(filename, ch[1])
向量搜索(分類)
向量搜索其實就是個最近鄰搜索的問題��,我們可以使用sklearn中的KNeighborsClassifier�。
訓練模型代碼如下:
import os
import numpy as np
from sklearn.neighbors import KNeighborsClassifier
import cv2
import pickle
import json

max_height = 30
max_width = 30


def make_im_template(im):
    template = np.zeros((max_height, max_width))
    offset_height = int((max_height - im.shape[0]) / 2)
    offset_width = int((max_width - im.shape[1]) / 2)
    template[offset_height:offset_height + im.shape[0], offset_width:offset_width + im.shape[1]] = im
    return template

label2index = {}
index2label = {}
X = []
y = []
index = 0
for _dir in os.listdir("ocr_datas"):
    new_dir = "ocr_datas/" + _dir
    if os.path.isdir(new_dir):
        label2index[_dir] = index
        index2label[index] = _dir
        for filename in os.listdir(new_dir):
            if filename.endswith("png"):
                im = cv2.imread(new_dir + "/" + filename, 0)
                tpl = make_im_template(im)  # 生成固定模板
                tpl = tpl / 255  # 歸一化
                X.append(tpl.reshape(max_height*max_width))
                y.append(index)
        index += 1

print(label2index)
print(index2label)

model = KNeighborsClassifier(n_neighbors=1)
model.fit(X, y)

with open("simple_ocr.pickle", "wb") as f:
    pickle.dump(model, f)


with open("simple_index2label.json", "w") as f:
    json.dump(index2label, f)
這里有一點值得說的是如何構(gòu)建圖片的向量�,我們分隔的圖片的長和寬是不固定的�����,這里首先需要使用一個模型��,將分隔后的圖片放置到模板的中央�����。然后將模型轉(zhuǎn)換為一維向量�,當然還可以做一個歸一化�。
生成結(jié)果
最后生成結(jié)果就是還是先分割一遍����,然后轉(zhuǎn)換為向量,調(diào)用KNeighborsClassifier模型�����,找到最匹配的一個作為結(jié)果����。當然這是識別一個字符的結(jié)果,我們還需要根據(jù)分割的位置進行一個排序���,才能得到最后的結(jié)果����。
import cv2
import numpy as np
import imutils
from sklearn.neighbors import KNeighborsClassifier
import pickle
import json
with open("simple_ocr.pickle", "rb") as f:
model = pickle.load(f)
with open("simple_ocr_index2label.json", "r") as f:
index2label = json.load(f)
max_height = 30
max_width = 30
def make_im_template(im):
template = np.zeros((max_height, max_width))
offset_height = int((max_height - im.shape[0]) / 2)
offset_width = int((max_width - im.shape[1]) / 2)
template[offset_height:offset_height + im.shape[0], offset_width:offset_width + im.shape[1]] = im
return template.reshape(max_height*max_width)
def split_letters(im):
# 2值化
thresh = cv2.threshold(im, 100, 255, cv2.THRESH_BINARY)[1]
# 縱向膨脹
kernel = np.ones((7, 1), np.uint8)
dilation = cv2.dilate(thresh, kernel, iterations=1)
# 找輪廓
cnts = cv2.findContours(dilation.copy(), cv2.RETR_EXTERNAL, cv2.CHAIN_APPROX_SIMPLE)
cnts = imutils.grab_contours(cnts)
# 過濾太小的
for i, c in enumerate(cnts):
x, y, w, h = cv2.boundingRect(c)
if h 15:
cv2.fillPoly(thresh, pts=[c], color=(0))
# 分割
char_list = []
for c in cnts:
x, y, w, h = cv2.boundingRect(c)
if h 15:
continue
cropImg = thresh[y:y + h, x:x + w]
char_list.append((x, cropImg))
return char_list
def ocr_recognize(fname):
im = cv2.imread(fname, 0)
char_list = split_letters(im)
result = []
for ch in char_list:
res = model.predict([make_im_template(ch[1])])[0] # 識別單個結(jié)果
result.append({
"x": ch[0],
"label": index2label[str(res)]
})
result.sort(key=lambda k: (k.get('x', 0)), reverse=False) # 因為是單行的�����,所以只需要通過x坐標進行排序����。
return "".join([it["label"] for it in result])
print(ocr_recognize("test1.png"))
以上就是python 如何做一個識別率百分百的OCR的詳細內(nèi)容���,更多關(guān)于python 做一個OCR的資料請關(guān)注腳本之家其它相關(guān)文章!
您可能感興趣的文章:- python3使用Pillow��、tesseract-ocr與pytesseract模塊的圖片識別的方法
- python3光學字符識別模塊tesserocr與pytesseract的使用詳解
- python PaddleOCR庫用法及知識點詳解
- python EasyOCR庫實例用法介紹
- python muggle_ocr庫用法及實例代碼
- Python 實現(xiàn)任意區(qū)域文字識別(OCR)操作
- Python實現(xiàn)OCR識別之pytesseract案例詳解